Sowing Seeds Indoors -- In 4 Steps!
March is for Making Messes!
Direct Sowing -in the biz- is known as the process of planting seeds directly into your outdoor garden beds. Some varieties of plants prefer this method of sowing, because they dislike having their tender roots disrupted by transplanting, while others thrive on getting a head start indoors!
Why I love indoor-starters:
Cost-Savings - By starting from seed you can grow big beautiful healthy annuals AND perennials for a fraction of their mature price at nurseries.
Unique Varieties - Seed suppliers have extensive collections available to chose from, while nurseries tend to just stock their best sellers... which can get a bit repetitive.
Custom Colours - Nurseries also focus on stocking common colour palettes. Starting from seed allows home gardeners to get creative exploring unique botanical shades, textures, and variegations and without limitations when designing their landscapes!
Plant Therapy - Best of all, you get daily doses of botanical joy through gardening in the dead of winter! And regardless of your success rate, getting your hands dirty, smelling the soil and nurturing your sprouts is rewarding for the soul and your general mental health.
4 Steps to Seed-Starting Success
Speaking of success rate, here are a few tips to get you on the right path!

Setting Up Your Growing Space - By starting from seed you can grow big beautiful healthy annuals AND perennials for a fraction of their mature price at nurseries. I'm going to say something shocking -- there's nothing wrong with bootstrapping your grow op. I have been seriously seed-starting for several years now and after investing in dozens of products (many a huge waste of money as it turns out) I have concluded that you really only need 4, maybe 5 supplies to get started:
Seed Trays - 100% you can make your own containers by poking holes in the bottom of yogurt cups, but you're still in need of a solid bottom soaking tray and a clear plastic dome to cover in early days of germination. For this reason I would suggest you just suck it up and head to Canadian Tire for their $9, combo packs containing all three components.
Look past the "Biodegradable Peat Pots", which won't last more than a couple weeks, and grab a tray or two that meets your needs. I'm on my 3rd season using the same set of trays (I wash and lightly bleach them between seasons) so you can really stretch that 9 bucks I promise!

2) Clean Soil - any basic potting mix is fine for starting seeds. Don't be swayed by the marketing of special "seed starting soil" touting "moisture control", and the inclusion of "mycorrhizae". In fact, worrying about nutrients in the soil at this point is unnecessary as germination (sprouting) is only concerned with the soil's moisture (not too soggy) and density (ease at which roots can penetrate). Fertilizing comes later for successful sprouts so as long as you buy a fresh bag (a new bag is sterile) of soil, pick out the sticks, crush the chunks and manually keep that soil moist, you're good to go!
** DO NOT USE SOIL FROM OUTSIDE** - odds are it's composition is too dense and may contain pests and disease!

3) Shelving - any shelf will do as long as it's level and can support the cords and weight of your trays, lighting and heat mats. I prefer using wire rack style shelving (see below) which I got from Costco, because I can easily adjust the level of my lighting over the seedlings, but smaller versions (Ikea has a good selection), or stackable shoe racks, even a folding table work just fine!

4) Light - This is integral. Most seed varieties require light to germinate, and unfortunately the windowsill is unlikely to cut it, especially for larger trays of seedlings. But contrary to what your Amazon search might suggest, you don't necessarily need those $$$$ full spectrum grow lights. I liberated a few florescent shop lights from a basement renovation a few years ago and prefer those! True, shop lights might not be as energy efficient as the LED option and they do put off some heat, but hear this: you're energy bill isn't going to skyrocket over the use of a lamp or two for a few weeks, and you want that warmth!
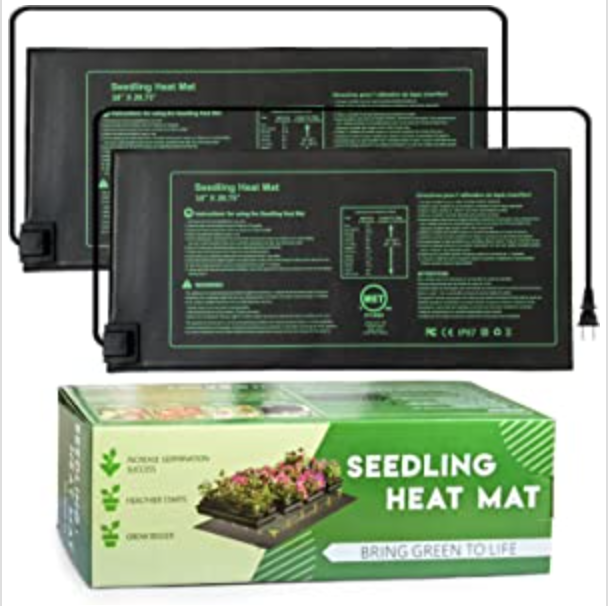
5) Warmth - Ahhhhh warmth! Without a doubt adding a seedling heat mat to my sowing process dramatically increased my success. The added warmth to the bottom of the seed tray not only increased germination speed, but also the number of sprouts!
While the mats are not essential, especially if you are new to seed sowing/starting small, you can still find success by positioning the trays under those warm lights during the day, and at night placing the trays on floor-level heat registers.
Select your Seeds
All seeds are not created equally. Each seed variety has different germination success rates (meaning some plant seeds are naturally better at starting than others) which is heavily influenced by the quality control measures the harvester practices, and the way they are stored/handled during distribution/sales. For this reason I don't buy seeds from retailers that don't specialize in it. Sorry Dollarama, this means you!
Where do I buy my seeds?
So if Dollarama is off the list, from whom do I buy my seeds? Here are my top 3 go-to suppliers in alphabetical order:


1) Johnny's Seeds (Maine, USA)
Johnny's has a great selection of flower, vegetable, fruit and herb seeds! They're of 100% non-GMO quality and have a satisfaction guarantee policy so you can learn to grow without the worry of wasting money if you're unsuccessful. -- Phew!
2) Stems Flower Farm (Cookstown, Ontario, CAN)
I am a lover of local through and through so I would be remiss if I didn't celebrate Stems Flower Farm in Cookstown. A small, but mighty, family run business, Stems does have a wide selection of seeds. Bonus: I love their online shopping tool for filtering options by colour and growth habit (ex. filler, focal, foliage, thriller, spiller). The makes garden planning much easier!
3) William Dam Seeds (Hamilton, Ontario, CAN)
If you want a larger selection, like Johnny's, without worrying if US customs will block some seeds at the border, William Dam near Dundas ON is my go-to. Online or in store, they have the best "dam" selection of seeds and supplies! Another family-owned and operated business which began in the 1950s, they put a lot of effort into seed trials and development to "seek new flavours, better disease resistance, interesting colours, [and] productivity"!
What if you're not ready to get swallowed up in the online seed shopping abyss? No problem, the Garden Centre of your local nursery like Sheridan and Terra Greenhouse, or garden centre like Home Hardware, Canadian Tire and Home Depot will have a decent selection to choose from.
Which seeds should I choose?
Well that's totally up to you of course! But if you'd like a little direction here are my suggestions:

Ask yourself "what do I have room for?" - Where are these little seedlings going to live after you start them inside? Are they for patio planters, or are you starting a 20ft veggie patch? Seeds may be small to start, but they can quickly get out of hand, so consult the packet's info on growth habit and choose wisely.
Start small - Remember the saying "less is more?" that is accurate for first year growers. Try 2-3 varieties, maybe in a couple colours, and start with this. Once you get the hang of that add more next year!
Take it easy - Unfortunately seed packs don't come with beginner, intermediate and expert grower ratings so when you're choosing your varieties review the back of the package and check out how many days they take to germinate, and review the growing tips. Generally, the lower the germination days the faster you see results - yay! And growing tips will help you devise if they're too high maintenance for you.
Count backwards - This is probably the most important step: deduce when you can start sowing the seeds. Each variety package will tell you if and when to start sowing the seeds indoors. For example it will say: "sow seeds indoors 4-6 weeks before the last frost". A quick Google search of "when is my last frost date" will advise you based on your region, so based on that date count backwards and start sowing!
Sow and Grow
FINALLY! Now that you're versed in planting theory 101, let's get into praxis!
Step 1: fill your seed cells or pots with your potting soil. Don't jam the soil in and squish it down too hard; remember we want loose soil so our little friends can send their roots freely throughout the medium.
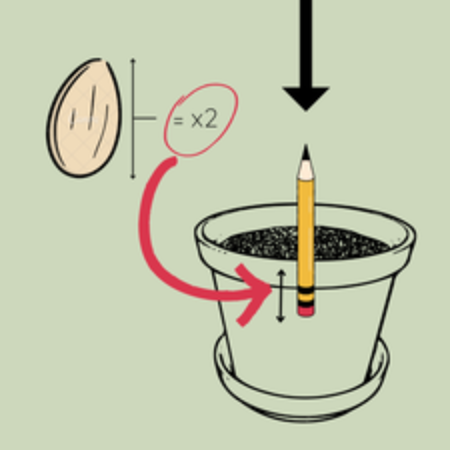
Step 2: sow your seeds at the recommended soil depth. Depth guidelines for each type of seed are usually indicated on the packet, but a general rule is: sow 2x as deep as the longest side of the seed.
**I recommend sowing 2 seeds per cell so if one fails it's not a wasted cell; you can always deadhead the weaker sprout if they both germinate**
Step 3: lightly cover with soil. For really tiny seeds (like foxgloves and rudbekia [Black-eyed Susan]) I skip this step by dropping the seedling on the surface and just sprinkling the top with a very thin dusting of soil or vermiculite (a cheap moisture retaining grain) because I don't want to smother the seed shielding it from all light, nor do I want it to dry out. For larger seeds (like sunflowers) I use a pencil to press a path to get it way down in the soil and cover it up!

Step 4: Bottom water those babies! WTF is bottom watering? Remember those holes in the bottom of your seed cells? Yup, sit them in their corresponding watering trays and load the tray up with water using a small spouted watering can. Through the holes the soil with absorb the water it requires without disturbing the tiny seeds on the top. Once the top layer of soil is saturated, remove the water below (we don't want it too soggy in there) and then carefully place the clear plastic dome over the tray.
Step 5: Now place your tray under your light source and -if you have it- on top of your heat mat. Alternate keeping the lights on for 12 hours of the day, and the heat mats on the opposite 12 hours of the day. The separation will have the plant concentrating its energy in different directions at different times -- which is ideal. Once ~75% of the seeds has sprouted, remove both the dome and the heat mat. These tools have done their job and now it's time for that sprout to get to work!
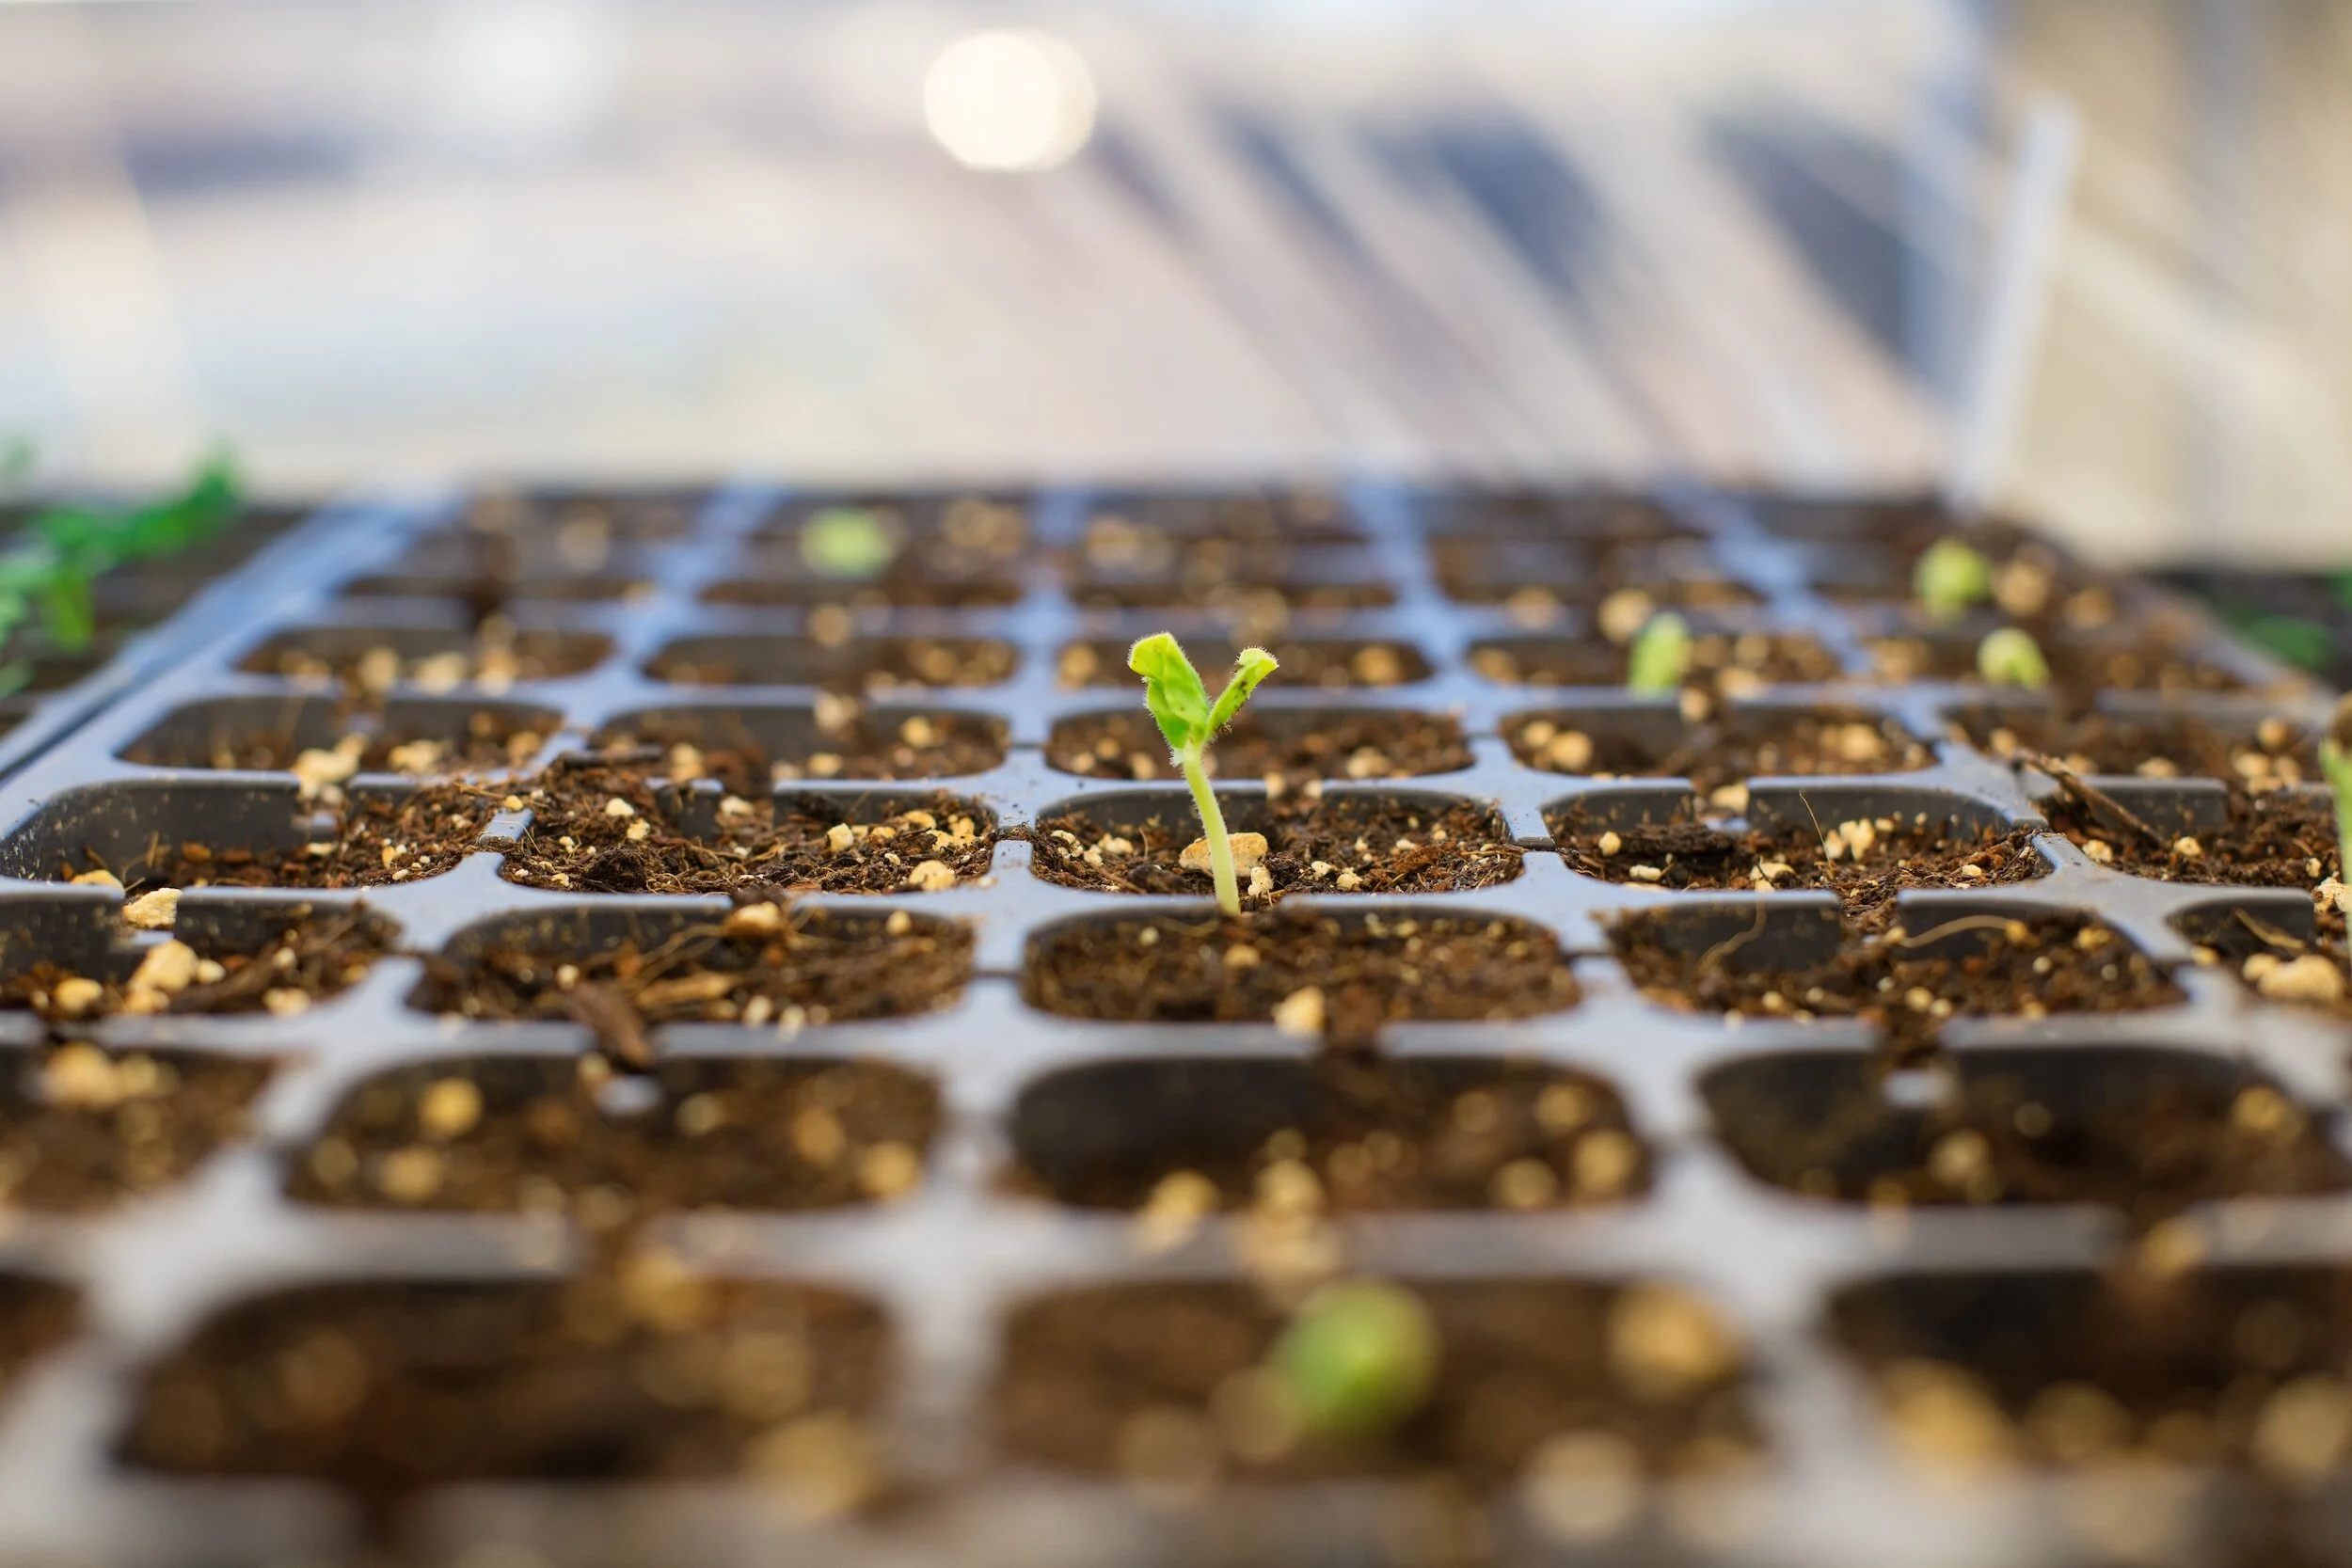
Step 6: be patient. Holy smokes I know its hard, especially when the "Days to Germination" estimation on the package seems off. Odds are, if you keep to the plan you'll see some little green friends emerging soon!
Harden Off
So your little sprout babies are growing well -- CONGRATS! But now what the heck do you do? Remember this: don't just toss them in the ground as soon as the snow melts. You will need to wait until the threat of frost has passed and, even then, you'll need to spend a week hardening off your haul.
Baby It's Cold Outside
WHAT IS HARDENING OFF? "Hardening off" is the processes of gently introducing your little plants to the great outdoors. It involves:
setting the seedlings outside for a few hours a day and gradually extending that time period daily for 1 week
sheltering your trays in mixed shade away from strong winds and rain
Once they're able to stay outdoors full time, they're ready for your prepared beds!
Still confused? Watch this!